- How to Digitally Record Audio Files
You will need the following stuff to make your recordings:
Needed Materials for Hardware Setup
Setting Up Your Hardware
Depending on the type of recordings that you wish to make, your setup may vary from mine; however, the basic setup will remain the same. Each setup will have some kind originating audio source, such as a tape player, CD player, Live microphone output, etc. This source will need to be connected to the input of your sound card on your computer by way of a cable, possibly using some adapters. Finally, you will need recording software to actually record the audio.
Now that you have an idea of the hardware setup, follow the directions below depending on the format of your original recording.
CD FORMAT: Few people have sermons previously recorded in CD format; so if your original recording is in another format, skip to the next section. But, if you have a CD-ROM copy of the desired audio, then you can use a program called a stripper, to "strip" data from the CD and turn it into a WAV file. I have only used a shareware version of Audio Grabber and Audio Catalyst. I am aware of other strippers. Exact Audio Copy is freeware, has tons of options, and works well. Please check the site below for a list and review of shareware versions of other strippers. Once you have mastered the use of your stripper software and produced a WAV version of the audio, then you will be ready to skip to the next section: Noise Reduction. However, you may not need to reduce the noise of your recording if the original was high quality. Please see the following pages for more details on rippers and related software:
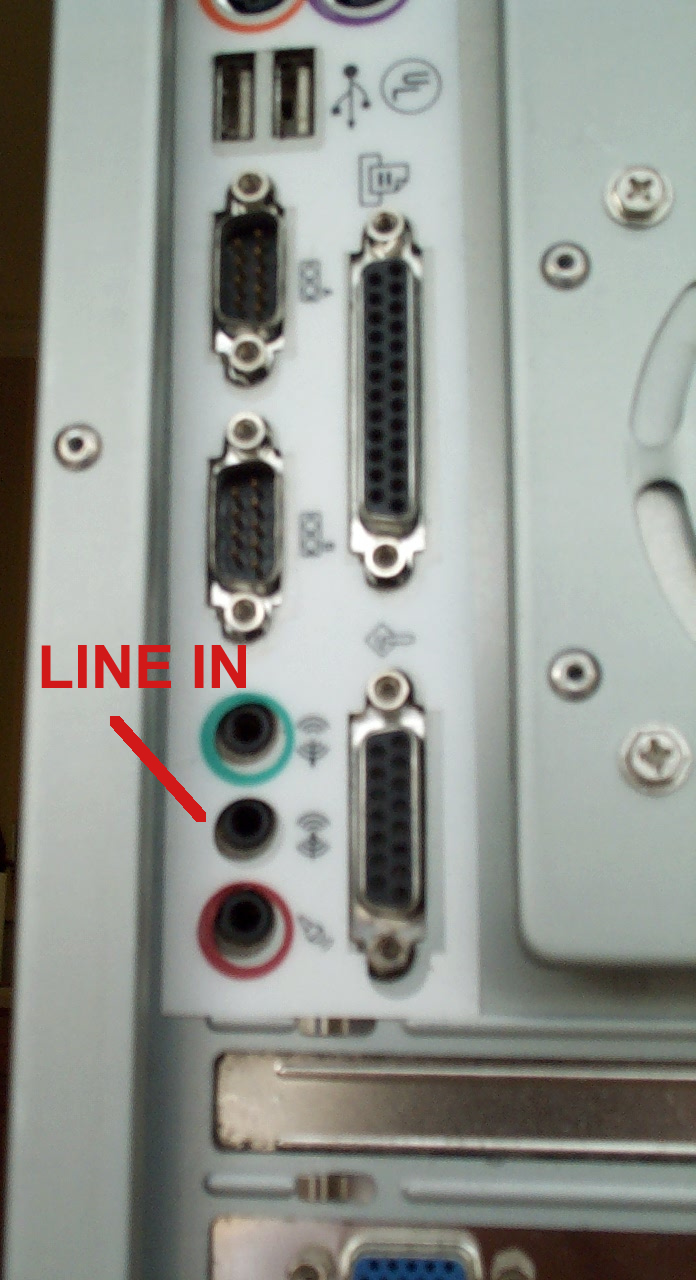
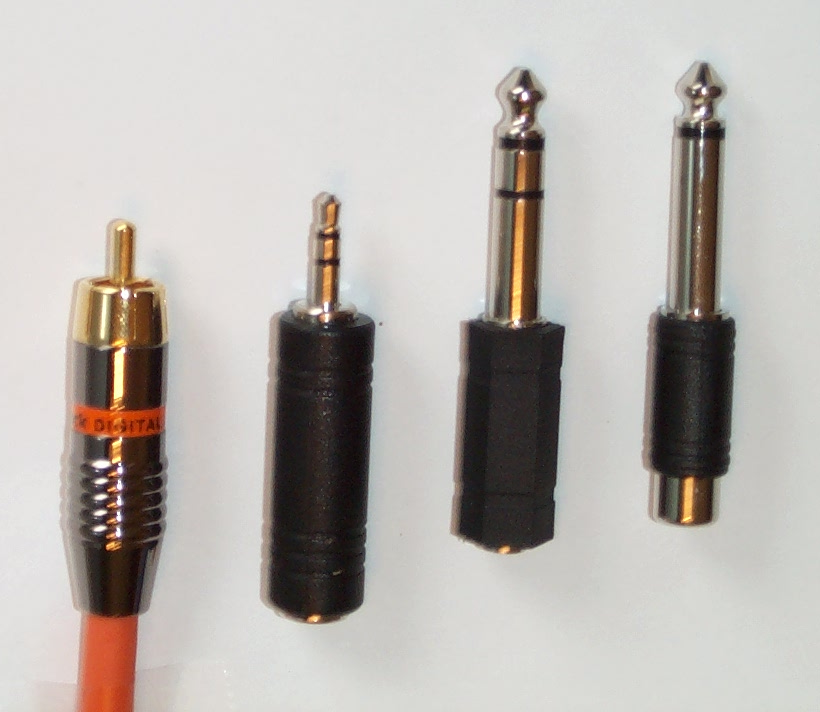
ALL OTHER FORMATS: First, you will need to locate the connection ports on your originating source and the sound card on the back of your computer. On your originating source, look for some kind of output port, like a headphone receptacle or, even better, an RCA Line Out port. On your sound card look for some kind of Line In port. A microphone receptacle will work, but a Line In port will be better. Once you have done this, then you will need a cable, and possibly some adapters, to connect your source to the sound card. I bought a 6' cable from Radio Shack that will plug into the "HEADPHONES" receptacle on my tape player and an identical LINE IN port on my sound card in my computer. For you it may take some time at Radio Shack, or a similar electronics store, to find a cable that will match your system, since everybody's setup may be a little different. If you cannot find a pre-manufactured cable to fit your system, adapters, connectors, and other neat gadgets can be purchased from Radio Shack to adapt a cable to fit your system. Expect to spend between $5 and $10 on this step.
Recording your WAV File -
Once you have completed your hardware setup, you will need a program to record and edit your audio files. Usually the sound recording software that come with your computer does not support high sampling rates; i.e., they make lousy recorders with few options. I know of three packages designed to make great recordings:
- Cool Edit 2000 - This program comes in two versions, Cool Edit 2000 and Cool Edit Pro. Both versions allow you to record WAVs, as well as encode the WAV into MP3! You can download a shareware version of CE2000 and a demo of CE Pro 2. The shareware version of CE2000 is free, but it is also crippled. To help motivate you to register the software, the shareware version comes capable of using only 2 of its 6 sets of features. Every time you run the program, it lets you pick 2 of if its feature sets. One of these must always be the recording/saving set. Without this option, you will be unable to record from your connected player and to save any changes made to a previously recorded sound file. The other set that you will use frequently is the "Amplifying/Normalizing set". To take advantage of other sets, you must save your changes, close the program, reopen it, and choose the desired set. If you don't like doing this, registering will put you out around $50 (They do have academic and non-profit discounts). This is the one that I recommend and describe below. The functionality can be extended through the use of "Plug-Ins", which provides more functions like Cool Edit Pro 2.
- Cool Edit Pro 2 - The demo can be downloaded for free, and it is much nicer than the regular Cool Edit 2000. It also has a nicer interface and many more features. Unfortunately, the demo is severely crippled and will not allow you to save any files that you may record or change. But, its nice for exploring. To register this package will set you back around $400! Because of this I would recommend the CE2000 version; it will have all you need for this purpose. The noise reduction functionality from Cool Edit Pro 2 can be purchased as a "Noise Reduction Plug-In" for Cool Edit 2000.
Gold Wave and Sound Forge - These are two other packages. I have used neither of these. I found all I needed in CE2000, so I did not really investigate these much. Sound Forge is probably the biggest competitor to Cool Edit, and it is possibly more well known, and maybe a better product. Since I started to use Cool Edit, I have continued to use it, without much other investigation. Gold Wave comes in a shareware version, similar to CE2000.
Using CoolEdit 2000 to Record -
If you do use Cool Edit 2000 to record audio files, here are some abbreviated instructions:
- Choose "Open Blank Sampling Instance" and pick the fastest sampling rate (48000 Hz) and the Mono Setting. The 44,100 Hz sampling rate is slightly more universal, and can does not require resampling to be made into a CD. If a later applications states that it "cannot support sampling rate" or something like this, try using CoolEdit to "Convert Sample Type" to 44,100 Hz. This is the sampling rate on all music CD's. So, use the 44,100 Hz rate if you plan on putting the audio onto a CD.
- Once you have your hardware setup, start playing your tape/CD player and press the "Record" button in the CoolEdit window.
- After the tape is finished, press "Stop" in the CoolEdit window to stop the digital recording. If you notice that the audio is not centered about the red horizontal line (zero), then try turning off your computer and player, unplugging the dubbing cable, turn equipment back on, and finally plugging the dubbing cable back in. Sometimes either the cable, card, or line port develops a static charge that can only be removed in this fashion. This static charge cause the entire audio file to be shifted above or below the red horizontal line.
- Select the entire the wave: go to "Edit" > "Select Entire Wave". Go to the "Transform" > "Amplitude" > "Normalize" menu. Select 100% normalization and "0% DC Bias Adjust". This will make the recording louder without having to be turn up the volume when being played. Also it will produce higher quality audio during playback, because it reduces noise from analog amplification during playback on all players. Once you click OK, the computer will have to churn for a while. CoolEdit does a good job of predicting the estimated time left.
- Finally, save your new sermon. Click on "File" > "Save As" and choose the format as "Windows PCM (*.WAV)". This will save the sermon in an uncompressed format. A 45 minute sermon will take up about 250 Mbytes of space at 16-bit, 44.1 kHz, and Mono settings.
Some Tips for a Good Setup -
- "Better Equipment Can Make For a Better Recording"
- Now, if you have a noisy source, then having good equipment will not help
too much. Similar to a chain, the weakest, or noisiest link will determine
the final quality of the system. I used the integrated 48 kHz-16 bit soundcard
in my computer for several years with modest success. However, if you can
upgrade your soundcard to one that has 24-bit/96 kHz ADC, then this will help
in the Noise Reduction steps. Although you may not be able to hear a difference,
the extra information allows Noise Reduction techniques to perform better.
Good cabling helps too. Here's a couple of professional audio card makers
(expect to pay $200 for an entry level, professional grade sound card):
- "Aggh! Not the Light!!" - Watch out for electrical noise generators
that may be plugged into the same electrical circuit as your recording or
playing hardware. For example, whatever you do, do not have a fluorescent
light plugged into the same wall socket. You will hear the light in your recording!
I always turn off all the lights, computer monitor, speakers, etc., whenever
I digitize from a cassette. I have as few electrical appliances activated
as possible. Of course, microwaves, hair dryers, and vacuum cleaners are especially
bad, but I doubt you would have these on the same circuit.
- "Avoid Abuse of Adapters and Splitters" - This goes back to having
good cabling. Try not to use the headphones jack of cassette deck to drive
your L and R 1/4" TSR LINE-IN jacks on your computer. I am still doing
this because I do not have a nice tape deck, so it can be done, but it does
not help things. Try to use direct connections where possible.
- "Max Out, but Do Not Clip" - Set the recording level on your "Line-IN" for your soundcard to its max. Reducing it will cause the soundcard to not use its full bit range, artifically inserting bit precision errors. Also, turn your source volume up as high as possible without "clipping". Clipping occurs when the signal volume is higher than the soundcard can digitize. You will know this is happening if you see the volume meter at the bottom of CE2000 "peg" at the far right. Also, once the recording is finished, the sound wave will be clipped at the top and bottom. "Maxing out, without clipping" will provide the best signal to noise ratio for your original recordings. If you do clip, you will lose data, so do not turn it up too high.
Ready to Reduce -
Once you save the audio file, then you are ready to remove that nasty 60 Hz hum, or any other type of background static. However, you may want to jump over the next step, if this your first time through the process - just to simplify the first attempt. Also skip to the encoding step if you are satisfied with the quality of your recording. However, please note that background noises become amplified during the encoding process, so your finished product may be unacceptable, if the quality of this WAV recording was marginal. Most people will need to do some kind of noise reduction, so proceed to the next step to learn how to use CoolEdit to remove that annoying background noise.
| Back: Introduction and Overview |
|
Return to Home
Questions and Comments can be sent to us using this form.